Every RV owner agrees on one point when starting the ignition the worst of the worst sound is silence. Have you thought about the problem? Maybe is the RV deep cycle battery?
The battery is the heart of every vehicle, especially when it comes to RVs as they depend a lot on their battery pack to run smoothly and perfectly. Most of the time when the engine shows no mood of turning on! It is usually the problem of battery.
Ironically, RV owners don’t give as much attention to this important part of the vehicle as it demands and as a result, they end up in the middle of nowhere with a completely dead battery. We suggest all of our community regularly check the battery pack with a voltage meter. This proactive approach will save you from getting into a very troublesome experience.
This article will take you into an easy step-by-step guide to testing your RV deep cycle battery at home.
1. What do we need to know about the RV deep cycle battery?
Remember you won’t be able to do much once the water level exceeds your shoulder level, that’s why you should develop a proactive approach towards maintenance and testing of RV equipment and deep cycle battery.
- You should check your battery if you observe a sudden discharge of RV deep cycle battery.
- One of the warning sign of “soon-to-be dead battery” is headlights and other lights in your RV gets dim after 15 minutes.
- Another warning sign is if your RV deep cycle battery starts to take longer ignition time.
- If you suspect the battery is not handling too many electric appliances running at the same time then it is also an indication that something is not going right within the battery compartments.
2. How to test the voltmeter by ourselves?
One of the easiest and simplest tests that you can perform on your RV deep cycle battery is voltmeter testing.
As the name signifies voltmeter check the voltage level of your battery. This test is crucial as it tells about the voltage storage strength of the battery.
The voltmeter is an electronic device that is designed to measure the potential between two points. When the battery is fully charged the potential difference between the positive and negative terminal is equal to the battery’s full capacity.
For example, if you have a 12.6 V deep cycle lithium Iron phosphate battery then the potential difference between the hot and cold terminal will be equal to it when fully charged.
Understanding the working principle and know-how of reading the displayed data of the voltmeter is very crucial to determining whether the battery is strong enough to be placed in the vehicle or if a replacement is required.
3.What we should do when setting up the voltmeter?
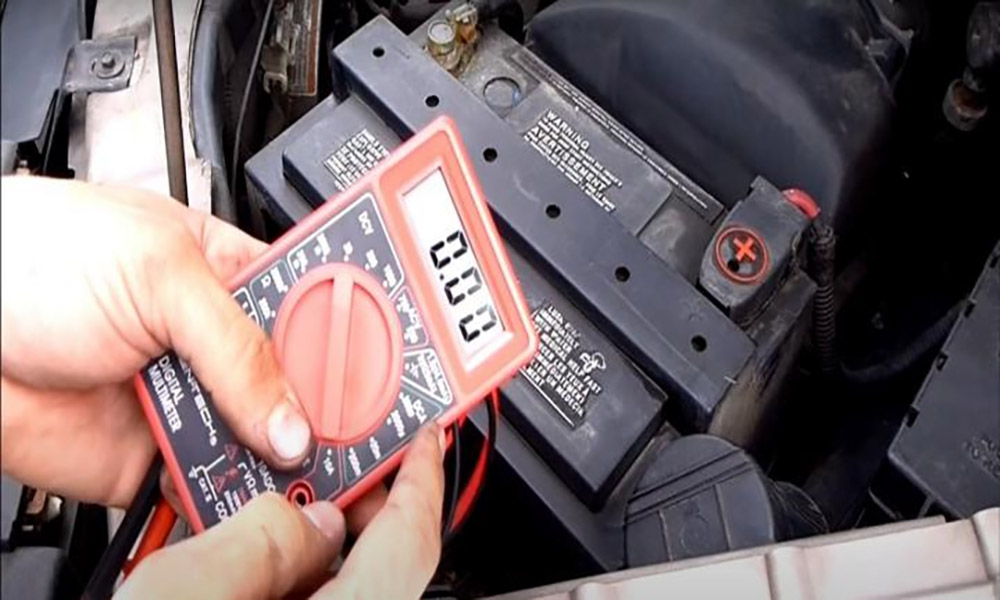
The voltmeter or the DMM, has two leads the red one and the black one, at the bottom of your meter you will see three female connectors for voltage testing put a black one in the common connector and a red one in the female connector with the voltage or V sign mentioned above it.
After that, you have to set the meter on DC voltage and the pointer on the dial should be pointed to the voltage level greater than your battery mentioned capacity.
For example: if you have a battery pack of 12.6 V, the meter dial should be set to 20 V this is important as sometimes voltage spice can occur due to some capacitor or overcharged battery. Setting it on a high level will provide some extra leeway.
4. How to pay attention to something disconnecting the Batteries
The first task of the testing is to open the battery compartment and put out the battery tray, If your RV has more than one battery connected in series or parallel you have to disconnect both of the batteries.
Start by pulling off the red cover on the hot terminal, if you are new to battery things we recommend you take some pictures before disconnecting any cables this helps you in the final stage of reconnecting. Use a wrench to disconnect the negative terminal first and then move to the positive terminal repeat the same step with the next battery.
You should be able to read the voltage level on the front or back side of battery but if your battery sticker is torn out, you can guess the voltage level by checking the connections of the battery, if the red terminal cable of one battery is connected to the red terminal of next battery then it is two single 6 volts batteries connected together to power the 12-volt system.
Tip: when measuring the voltage with the help of a meter, it is highly recommended that you use DMM (Digital Multi Meter) as reading data on digital meters is far easier than on analog systems.
In order to measure the voltage level of RV deep cycle battery, the voltmeter has two lead wires: A red probe and a black probe. Connect the red probe with the positive terminal (the one from which you pulled off the red cover) after that carefully put the black probation the cold /negative terminal of the battery.
Tip: While touching the probes, take care not to touch the metal part of the probes, always hold probes from the insulated part.
The moment you touch the probes and the battery is fully charged the display on the meter should indicate a voltage very near to 12.6 volts, it can be in the range of 12.2 to 12.6.
This voltage level indicates that the deep cycle battery is in good condition and can store voltage up to its maximum value. However, If you have recently charged the battery and have not used it recently and you see the voltage level in multi-meter below 11 volts then it’s a warning sign that your RV battery is not in good condition and needs to be replaced as soon as possible.

5.Crank Cycle Voltage Testing
After you have successfully checked the voltage level on the vehicle’s turned-off condition it is time to check its cranking voltage. below 9.5 volts.
Before performing this task you have to reconnect the battery as they were connected before. Use the picture you took before disconnecting to make sure you are connecting them back in the right way.
For this, you have to turn on the engine and switch on all of the lights and electric appliances, we want the maximum amount of current to be drawn from our battery. Before hitting the ignition button you should switch on all of the lights as you won’t get enough extra time while performing this second test.
Put the probes on the terminals of the battery and ask your partner to turn over the ignition key the moment the vehicle turns on its alternator and started the motor will try to fetch as much power as they require at this point read the number as they drop down. If the battery pack is in good condition the voltage should not drop down below 9.5 volts.
On the other hand, if you observe voltage level dropping down below 9.5 volts in a 12 volts system and below 4 volts in a 6 volts battery system then the RV deep cycle battery has failed the cranking test and it is highly suggested to replace the battery as soon as possible.
Another key thing to remember is; that if the battery level drops down below the threshold level but immediately gets back to normal level then it means the battery is in an intermediate stage not fully dead nor fully working, these batteries can last for a few more months before needing to be replaced with a new one.